The Problem
This fall while doing my winter shutdown and winterizing I did my typical inspection of the roof. Everyone should inspect their camper roof once or twice a year to make sure you don’t have any problems that could cause a leak. A roof leak that doesn’t get repaired can cause a tremendous amount of damage leading to repairs in the $1000’s, so it is best to stay on top of it. I highly recommend Eternabond to repair an RV Camper roof. Is it a Miracle Cure? No, not at all, But is a high quality product you should consider vs traditional self leveling sealants like Dicor.
I talked a bit about some repair using Eternabond in my article about our old camper, The Mistake Raptor.


One of the areas I hear about leaks the most is on the seams between the fiberglass end caps and the rest of the camper. The cap is typically a solid piece of fiberglass without a lot of give. This causes stress on the joints where the cap joins the trailer, eventually leading to sealant failure and leaks.
The Fix – Eternabond
Eternabond Roofseal is an interesting product. They call it MicroSealant technology. The functional part of the tape is a hyper-sticky dark grey material. Bonded to the top of this material is a white/tan/grey/black UV stable membrane to protect against the sun. As you unroll the tape, there is a clear silicone membrane on the sticky side. This allows you to roll it out and pre-stage before it sticks. REMEMBER: Once it sticks, it is stuck and quite difficult to remove.
DO NOT CONFUSE WITH THE FAR INFERIOR “Flex Seal” AS SOLD ON TV.
Folks on the internet keep recommending this stuff, and I STRONGLY disagree that it is an equivalent product
Prep Work – Eternabond
Proper preparation is key to success and longevity of any repair and this remains true when working with Eternabond.
- Scrape and remove any loose prior sealant
- Thoroughly clean everywhere the tape will be touching.
- I differ from the manufacture recommendations here (AT MY OWN RISK).
- All type of “rubber” roof manufacturers (TPO/EDPM/PVC/etc. advise to NOT apply any type of petroleum products to the roofing material as it can break down the “rubber.”
- Eternabond recommends Acetone as a cleaning agent. Acetone is petroleum based.
- Eternabond also say to use any cleaning solution that does not leave a residue.
- I cleaned the area with 90% Isopropyl Alcohol (not petroleum based)
- Ensure the area is DRY.
- This tape is completely air and water proof.
- Any water, even down in the seam, could become trapped.
- Trapped water could be VERY bad causing rot and mildew over time.
Installation – Roof Repair
I’ve said several times, once this stuff sticks, it is stuck. Go slow and plan as you go to prevent accidentally applying the material in the wrong place.
- Lay out the tape over the area to be sealed.
- Cut the tape leaving a bit more than should be needed. You’ll then trim the end before adhering the last part of a run.
- Lay the tape over the area to be sealed.
- Holding the tape in place with your hand, go end to end over the area being sealed.
- Look for bends, curves and obstacles.
- You may need to make cuts or slits into the tape to work around obstacles.
- The tape can go around curves somewhat. This will introduce wrinkles.
- Ensure the tape will completely span all existing adhesives and joints.
- Understand and plan for dealing with these things BEFORE you remove any of the clear silicone membrane.
- Look for bends, curves and obstacles.
- Make cuts and slits that are needed to get around obstacles BEFORE removing the silicone membrane.
- Do this in a “just in time” fashion to ensure the cuts and slits will line up with the obstacles.
- Peel back the first few inches of the silicone membrane.
- VERY carefully position the starting point getting the tape to stick. ONCE IT STICKS, IT IS STUCK!
- Work slowly, a few inches at a time over the length of the run.
- Pay attention to a few key things
- The tape should completely span any residual sealants.
- Prevent air bubbles. Pay attention as you press it down to ensure air has a way to escape as you proceed.
- If a wrinkle goes to the edge of the tape, pay particular attention to press down hard and ensure the adhesive bonds to itself and the underlying material under the wrinkle.
- If you have a large wrinkle to the edge of the tape, consider placing another piece of tape that spans the entire wrinkle out onto the underlying surface.
- Pressure is key. Once the tape is in place, go over every surface with a fair amount of force. I used the Eternabond Roller. It is very expensive for what it is and you can probably find a suitable substitute at the hardware store.
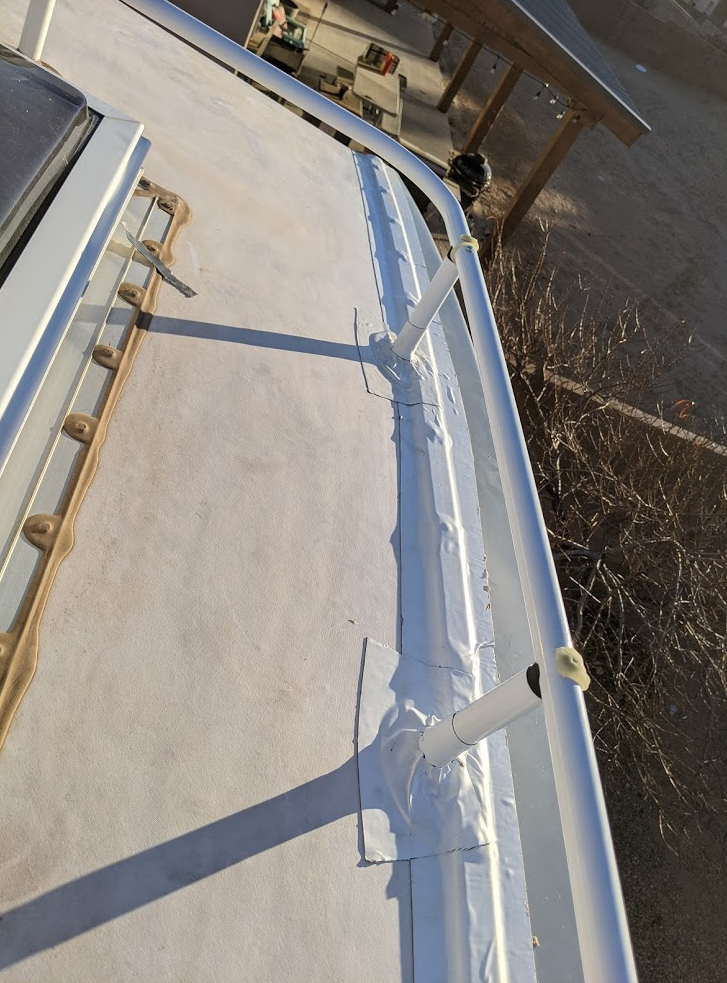
My Install – Eternabond Roof Repair


Once you work with this stuff you’ll understand. The way it bonds into surfaces and itself you will understand that it will be nearly impossible for water penetration. The adhesive material is very flexible and molds around imperfections. The UV protectant layer is not very flexible and is what causes the wrinkles over the functional material.
Here are the install instructions from Eternabond
I keep it in my bag of tricks in the camper. Never know when it might come in handy. They also position it as a way to fix holding tank leaks. http://www.eternabond.com/articles.asp?id=168.
Conclusion
I do feel pretty strongly about this product. It is no where near a miracle, won’t last forever, and is a bit of a pain to work with due to it’s extreme stickiness. There are folks on the interwebs that will say it is horrible, I’d never use it, and it just hides problems. I fully expect this install to last 5-10 years with no actions needed on my part. I know it was installed correctly and is not hiding any underlying issues. For me, the areas I’ve used it are area’s I no longer have to be concerned with. Over time, as other roof sealants fail on my trailer I fully intend to use use Eternabond as the repair.
I do wish there was a way to make it “pretty” so it could be used on the visable areas of the trailer as well. But alas – Proflex and Butyl tape are still the answers I use there.
I still keep Proflex RV and Dicor self-leveling sealants around. I still use Dicor to touch up small areas on the roof. But when an entire section of sealant has failed, Eternabond is my answer.
Thanks for reading – and Happy Camping!
Guys – I’d be remis to not mention this to you all. There are potential installation problems with using Eternabond for roof sealing. You must make sure all your seams are properly sealed. We are talking about “self roofing” and that means paying attention to all the potential leak points.
I do still believe in Eternabond as a roofing material, but like all of them care must be taken.
https://www.adventurousway.com/blog/replacing-our-rv-roof#root-cause
This blogger believes eternabond around one of his vents may have contributed to his full roof replacement. It wasn’t the only cause or potential cause listed but he found evidence of a leak, a leak that in my opinion could have been prevented during the eternabond install. I’m no expert in this, but want you to be aware.